

Become an Authentication Ninja to fight off hackers!
Authentication is the process of confirming you really are the person that should be let into an account. The common way online is with a username and password. But remembering long, strong, unique passwords for every single site? Come on, that’s insane!! Fear not, enter password managers. By the end of this lesson, you’ll be up and running with a password manager, 2-factor and backup codes, and will no longer have to remember a pile of annoying and weak passwords.
This lesson is longer than the previous ones. The big payoff is no longer needing to remember passwords makes life way more convenient!
Concepts
Password Managers
So what is a password manager? It’s an encrypted vault of all your other passwords. But what does that mean? You take one (really, really strong) master password, and use that password to encrypt (garble) all your other passwords. That way, even if your password vault is stolen, nobody will be able to read any of your passwords without your master password.
Secondly (and arguably more important) password managers make life online more convenient and easy. They can:
- make random, long, strong passwords for you so you don’t have to spend brainpower
- log you into your accounts with a the click of a button without even having to type in the website
- auto-complete forms for you like credit card info and addresses.
Trust me, once you’ve got one set up it is so worth it for these reasons alone. The added security becomes just a mega bonus.
What makes a good master password?
It should be obvious that your master password should be by far the strongest password you’ve ever made. Quick review of what makes one strong:
- REALLY long (not kidding, I’m talking at LEAST 25 characters)
- easy and fast to enter (on both phones and computers)
- not just dictionary words (either throw in a fake word that means something only to you, something in a different language, or break words in half with numbers)
The Computerphile video below is a much deeper look at how a hacker could break your password. Many of the discussion points are covered in this post so watching isn't required.
2-Factor and Backup Codes
As we learned in Lesson 1, 2-factor (or multi-factor) authentication makes it so that you need your password (1st factor) AND a one-time random code (2nd factor) to get into your account. This lesson is a really nice and efficient time to turn on 2-factor for every account that allows it, since you’ll have to log into all your accounts anyways.
When setting up 2-factor, most sites also offer you the chance to download backup codes. These can be thought of as one-time-use 2-factor codes, and are designed for when you can’t get your 2-factor code another way. This could be when you’re travelling and can’t receive a text message code, or if you’ve just lost your phone and need to get into the accounts to set up 2-factor on your new phone, or if you’re logging into a public machine one time.
Where will you store these codes? You can write a few backup codes down for travel, or give them to a friend or family member to help you in case you ever get locked out. Each backup code can only be used once, so if you ever use them all up, you have to generate new ones from inside your account security settings. Since a password manager can also be used to store backup codes, this lesson will be a good time to generate them.
Emergency Recovery
A password manager makes it harder to get into your stuff when you lose or can’t access your devices. This is by design, but it’s still worth thinking about ahead of time in the tiny chance you need to recover your password manager in an emergency.
What if you’re travelling and you lose ALL of your devices at once (think about a theft, or lost baggage, a fire, water damage), what steps would you do to get back into your email or your bank account, or to send a message to your family that you’re safe, or anything else of importance? Less stressfully, what if you need to login to someone else’s device where you don’t want to install your password manager (say to log into a shared Netflix family account, or to log into a PlayStation that can’t install a password manager)?
If you need to get into any accounts without your password manager, those passwords should NOT be generated by the password manager. Instead use the techniques in Lesson 1 to make long, unique and easy to remember passwords. Still store them in your password manager, but also store them in your brain. Even for these easier-to-remember passwords, if the account has 2-factor authentication, you may also need to have your backup codes to get past the 2-factor step. In this case you could have them written down somewhere safe, and keep them with you (hidden) when you travel.
Technical Note: Some services may ONLY offer 2-factor authentication using text messages (that is, no authenticator app or backup codes). This means you must be able to receive text messages while travelling to be able to get into your account, or else you have to turn off 2-factor before you leave. Of course, this comes with its own risks.
The point of this thought experiment is to make sure you understand how to get back into your password vault. In the case of BitWarden, which is covered in this lesson, your password vault is stored in their cloud and doesn’t require 2-factor by default, so as long as you have internet and your master password, you can get in. But others may have set up a vault locally, or in Dropbox, or have set up 2-factor for their password manager. All of these offer more security, but this security also make it harder to get in, so make sure you have the information to do it in an emergency.
Now that we’ve covered all the basic concepts, let’s get going!
Become an Authentication Ninja
You’ll need to carve off a big chunk of focused time for this lesson. Depending on how many accounts you have it could take a whole evening. But it’s like ripping off a bandaid; once it’s done it’s done forever. No spring cleaning on this one.
I recommend doing this one-time setup on a laptop, not a phone, as it would be significantly harder without a full keyboard and larger screen.
BitWarden — Password Manager of Choice
This lesson will focus on the password manager BitWarden. It is free, secure and easy to use, so is my go-to when getting people started. It has highly trusted security, their code is completely open-source so the public can review it to ensure it is safe, they get third party audits of their technology, and are recommended by the very hard to please privacytools.io.
BitWarden (like any cloud-based password manager) stores your garbled up passwords in their cloud, but they NEVER need to even see your master password. This means your passwords will not be compromised even if they have a security breach and hackers download your password vault.
The side-effect of Bitwarden not knowing your master password is that if you ever forget it, you will have to delete your account and manually reset ALL of your passwords, so DON’T FORGET IT! See more details on how this works for BitWarden here.
My lesson builds off components of the BitWarden help centre. Much greater detail can be found there if you get stuck.
I do NOT have a relationship with BitWarden. In fact, I used to recommend LastPass until they removed key features from their free plan. You can see that previous guide archived here.
Feel free to check out other popular password managers, like Keeper, DashLane & 1Password. Whatever you choose, make sure you understand the pricing model and that it has trusted security (namely they never require you to send them your master password).
Getting Set Up
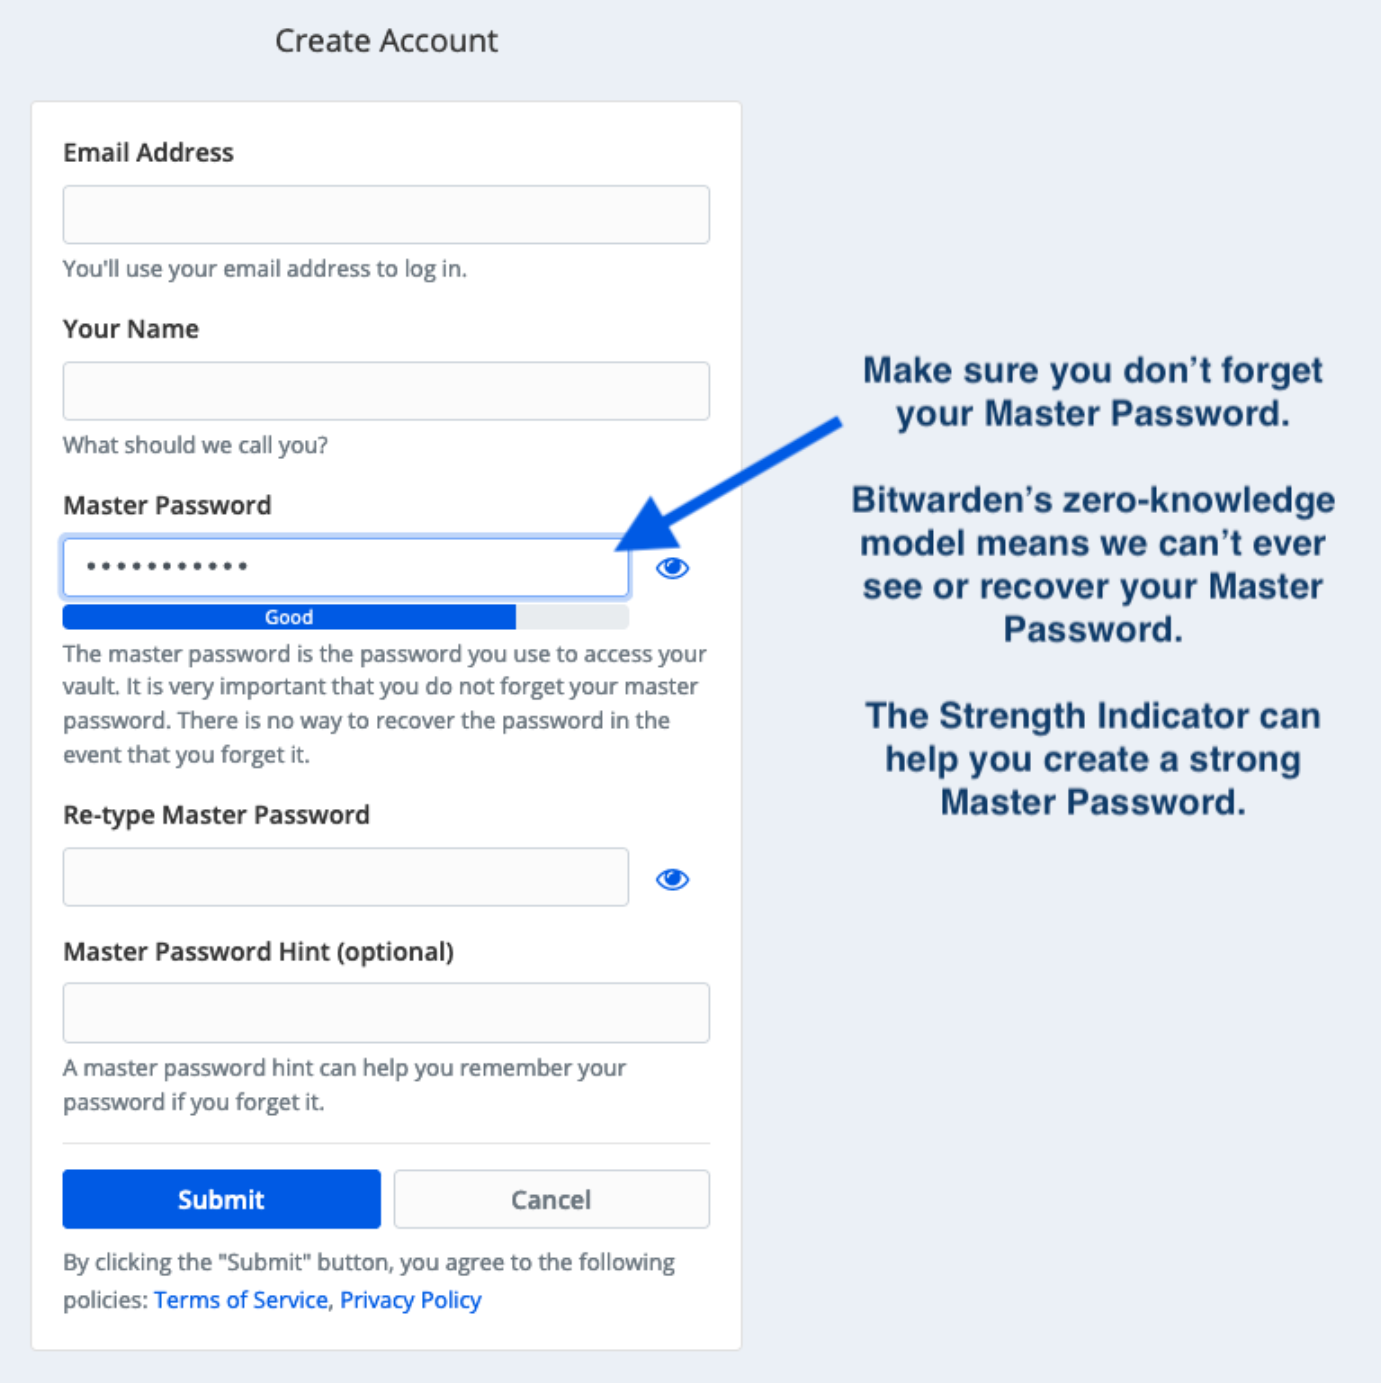
BitWarden setup is easy. Just go to their site and click the Get Started button in the top right. This will get you set up with a new account and your password Vault.
The password to this account is your master password, so remember to make it crazy strong!! If someone is helping you with this lesson, you should change your master password once it’s all done. You should be the only person that knows your master password, even loved ones don’t count. Go ahead and set up your account now. Once set up you'll have to click the verification link in your email too.
If you plan to fully complete this lesson right now, you may want to make your master password shorter for now, get set up, and then make it strong. But DON’T leave it weak!!! DO THIS AT YOUR OWN RISK!!
Download Browser Extension
From the download page, add your browser extension of choice. This will allow BitWarden to save and retrieve passwords as you need. Once installed you'll see a gray Vault icon to the right of your address bar. Click it and log in with your email and master password and it will turn blue.
Saving A Password to the Vault
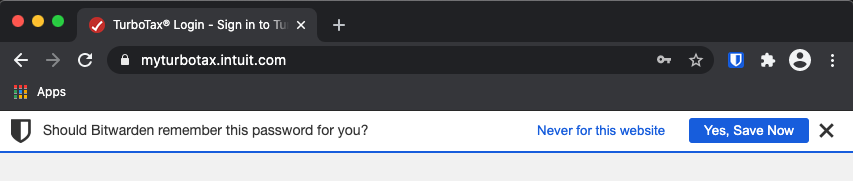
Now that you’re all set up, just pick any account you already have and go to the login page. Fill in your username and password and log in. BitWarden will pop up with a banner offering to save your password. Click Yes and the website, username and password will be saved to your vault.
Generate a Stronger Password
Now that you’re logged into that account, go ahead and change the password. On the change password page, instead of thinking of a new password, click the Vault button in your browser bar then click the Generator button (with the two arrows in a cirlce) to use the password generator.
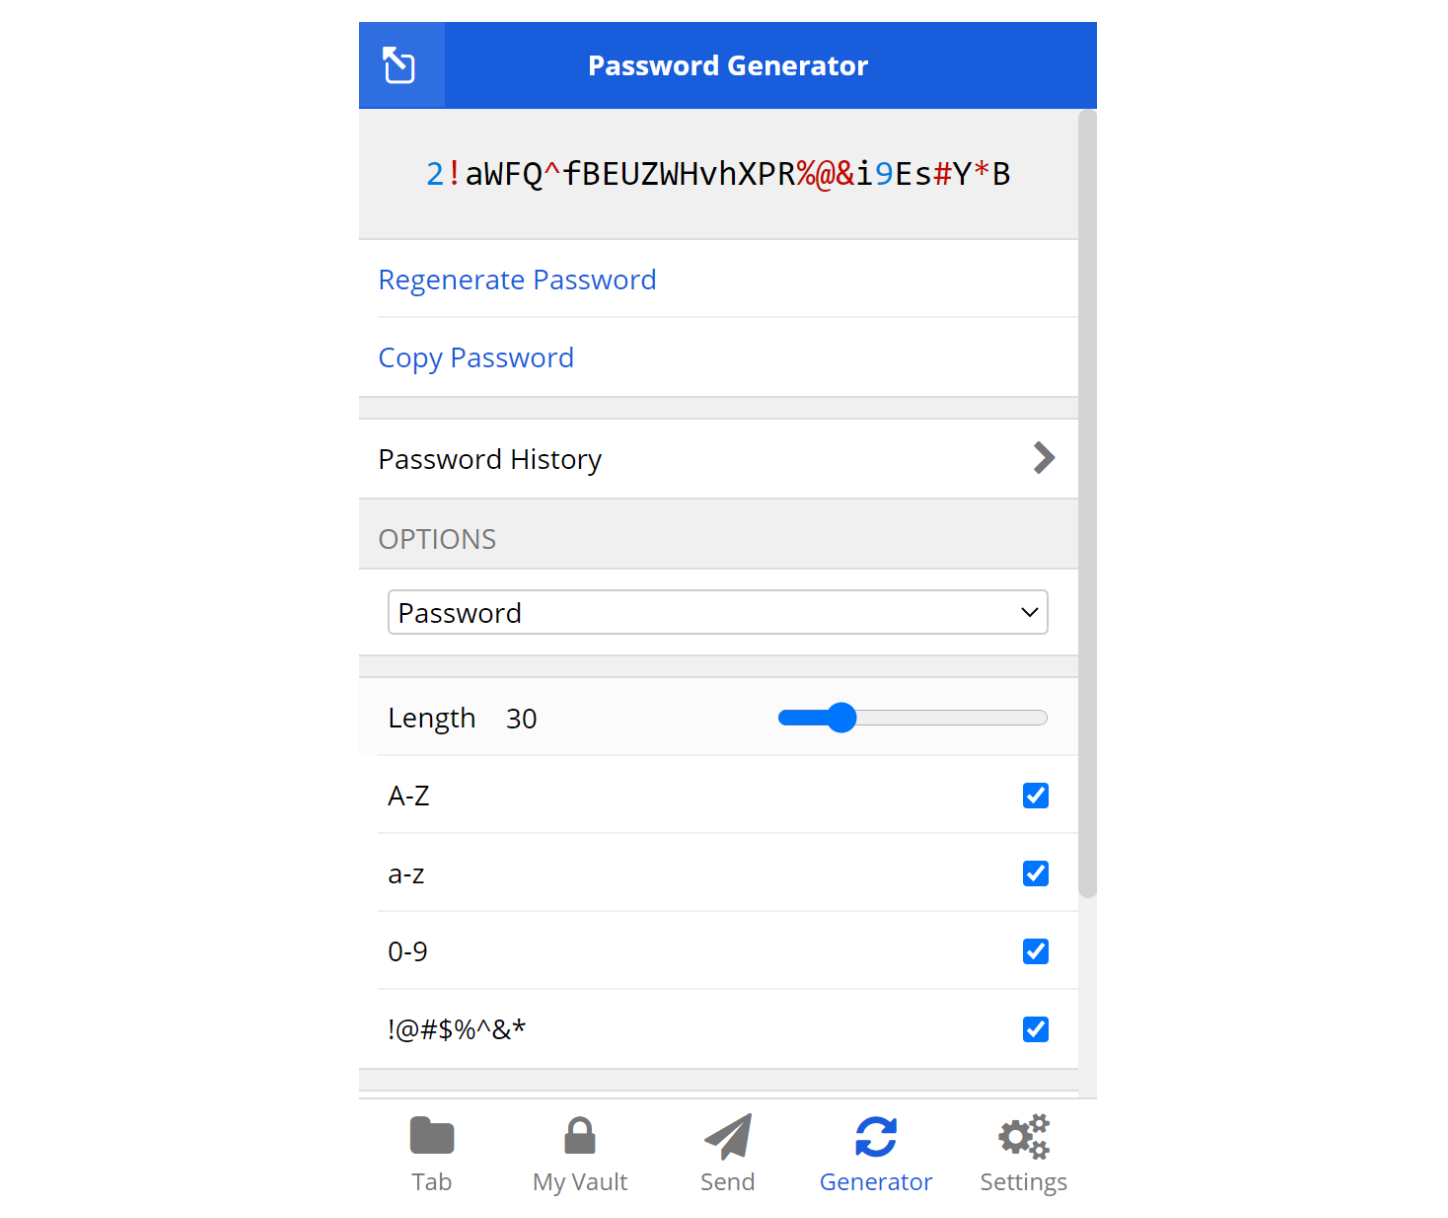
I recommend cranking the Length to at least 30 characters, and keeping all the options checked. Some sites have ‘maximum length’ passwords (shame on them!) and restrict special characters, so in these cases you’ll just have to change the settings to work on that site. One you're ready click Copy Password. Use your brand-new, strong, unique password to reset the password for the site you're on. BitWarden should notice and offer to update your password in the Vault. If it doesn't, search the Vault for the password and update it on your own with the password you just copied.
You can also quickly generate a password with your most recent settings by right-clicking anywhere in your browser and selecting BitWarden > Generate Password (copied)
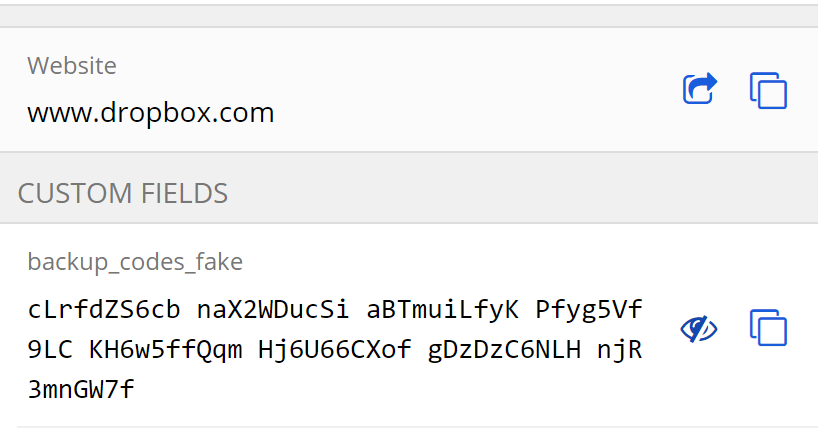
Save Backup Codes
Since you’re in your account settings anyways, you should generate backup codes if they are offered and save them in BitWarden. Simply edit the site and copy your backup codes into the Custom Fields section as a "hidden field". Remember they are one time use so if you ever use one you should erase it here to avoid confusion later.
Security Question Answers
You can also use Custom Fields to save the answers to the security questions that some sites enforce like "What was your mother's maiden name?" And don't use your real mother's maiden name as that is easy for hackers to figure out! Simply generate another password and store that.
Turn on 2-factor authentication (2fa) for this site
This is also a good time to turn on 2fa with text messages if you haven't already. Do this for all accounts it's offered on, but especially sensitive ones like email, banking and work accounts.
Now Rip that Bandaid Off!
This is where we start the real big task. You now need to find ALL your accounts, and use BitWarden to generate new passwords, which will be stored in your password vault. It can be really daunting to try to remember all of the accounts you have online, so here are some tricks:
- look in the Keychain app on your Mac: this app collects many of the username and passwords you use on your laptop
- browser saved passwords: many internet browsers save your passwords (links for Chrome, Safari, Firefox)
- search your email: search for emails with a subject with ‘Welcome’ in them, or search the word ‘password’ in your email, which will give you a pretty good list of many of the sites you’ve signed up for
If you’ve forgotten any passwords, that’s ok, you’ll just have to request a password reset.
For each account, rinse and repeat the following:
- Log in to the account and add it to BitWarden
- Update the password with a strong, generated one
(the only exception is your master recovery email, which you should leave as the one you made in Lesson 1, which may be good to leave as a passphrase you can remember in case you ever need to access it while unable to access BitWarden) - Turn on 2-factor authentication (if available)
- Copy your backup codes into the ‘Custom Fields’ of the site
(four hours later) Phew!!! That wasn’t too bad was it?
Set up 2fa on BitWarden [But With Warning]
The final recommended step is to add 2fa on BitWarden itself. With 2fa even if someone gets your master password you will still be protected. BitWarden has ALL your passwords, so I recommend you take this step, however there is a very important warning below you must understand before proceeding. Read it several times.
WARNING: If you set up 2fa, then lose your 2-factor device in the future, you must provide your recovery code to be able to regain access to BitWarden. Since BitWarden does not store your master password or your recovery code, they cannot help you unlock your account otherwise. This is by design, for your safety. More information is here.
Ok, if you understand that and promise to protect the recovery code, go ahead and set up 2fa. The recovery code should look like this:
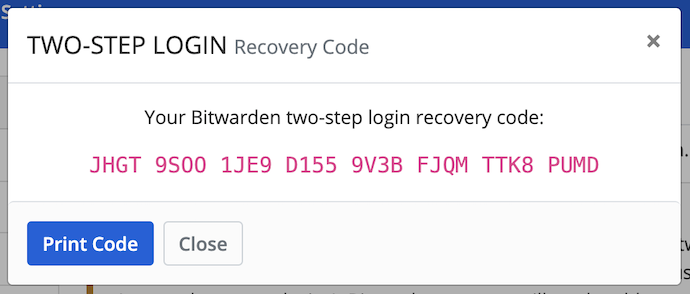
You must save and store this code outside BitWarden and never lose it. Do not even think of turning on 2fa if you think you may lose this code. More info on the recovery code is here.
Welcome to a New and Better World
Now whenever you go to a site, if you’re logged into BitWarden, your info will be automatically entered. If not, the shortcut key is ctrl+shift+L (Windows) and cmd+shift+L (Mac) for autofill.
Nice! If you want to go to a site, instead of typing it into your browser, search it in your Vault, click it, and it will navigate to the site and log you in. Sweet! Whenever you want to sign up for a new site, add it in BitWarden, use the Generator, and start from day one with a strong password. Awesome!
If a site doesn’t autofill properly for whatever reason, you can click the Vault and manually copy/paste the information into the login page. It also just might be that the site didn’t save enough information, so you can edit the entry in the Vault to fix it.
Using BitWarden on Mobile Devices
Now that you’re all setup on your laptop, download the BitWarden app for your mobile device. Download the app, and simply log in with the same email and master password. Everything will then sync, that easy.
BitWarden works slightly differently on each device, so I recommend skimming their guides for Android and iOS. It's worth going through the extra steps to make sure Autofill is working properly for your convenience.
Security Clean Up
Remember when we used the list of saved passwords in Chrome or another browser to find out what accounts we had? That’s a REALLY BAD place to store passwords. So let’s go back in there, and turn off the feature that even offers to save passwords (we’re better than that now). Also, delete all the ones it’s saved from our old life pre-BitWarden. This includes text files or Excel sheets you had with all your passwords stored before.
Bonus BitWarden Features
BitWarden has plenty of other features you may be interested in:
- Other Items: BitWarden can store more than just logins. It also stores Cards, Identities and Secure Notes, and is more secure than storing them in your browser. You could even store your driver's license, passport and medical documents safely.
- Auto-Fill Cards & Identities: BitWarden is a secure and convenient way of auto-filling credit card information, addresses and other form information to auto-fill it when you need it online.
- 2-factor via Authenticator: BitWarden can generate 2fa codes for your sites so you don't need to receive text messages. This is a bit more advanced, so follow their guide carefully.
- BitWarden Send: Can be used to send information to anybody securely.
Now that we’re at the end, make your master password strong (if you had made a weak one to get through this). Also, if you have a security deposit box or a safe, it may be a place to store a printed version of your master password and recovery code if you feel you may ever forget it.
Congratulations! You are now an Authentication Ninja.

A reminder one more time, if you made your master password weak to get through this lesson, or if anyone else still knows it, RIGHT NOW is the time to make it strong, unique, and only known by you.
Proceed to Lesson 4: Play Safer Online!
Back to the Lesson Plan
Header image credit: Peter Pham